This page will detail how to install and setup EZ-Builder on your PC or tablet/phone. It will cover everything you need to get started with EZ-Robots. The ‘Start Here’ guide that is included in every box is also an extremely useful tool. Please note that EZ-Builder currently only works on Windows (not Macs or Chromebooks).
At the bottom of the page is also a detailed list of practices that we heavily recommend. These practices will help to ensure that your robots work the way they're supposed to, and quickly find any issues that you may have.
Find the green button labelled “Download EZ-Builder Installer.msi” and click on it. (1) Once it’s downloaded, click on the file to open it. (2)
This prompt or a similar one like it may pop up. Click on “Run”.
The subsequent pages will be listed in the above window. Click the buttons as follows:
Click “Next”.
Select “Typical”.
Click “Install”.
If a security prompt shows up, click on “Yes”.
Click on “Finish”.
Your computer may ask to install necessary C++ or C# .net structure code. This is normal, and you should allow it to happen, as often the software will automatically go and find the necessary files. If you have any issues, please contact [email protected]. Now you have properly installed EZ-Builder. However, there are a few more things to do before we can be fully set up.
Step 2: Setting Up EZ-Builder
When you first open EZ-Builder, you will get a popup with some information and arrows to continue. Read through these pages, click on the arrows to go to the next page. At the end, check off the Agree to Terms and Conditions checkbox and click OK.
We now have to login to an account or create one. There are two options:
You create your own EZ-Robot account. This allows you to have your own EZ-Cloud and restrict anyone from accessing your projects that are not labelled as public. This gives you the most flexibility.
You can create a general account that everyone can use. This allows projects to be shared between students, which may be a positive or a negative. A potential problem is that students may end up deleting other student’s projects, as they all have access to every project stored on the cloud.
For either one, first you must go to the “Options” tab, and then click on the button “Account Settings”.
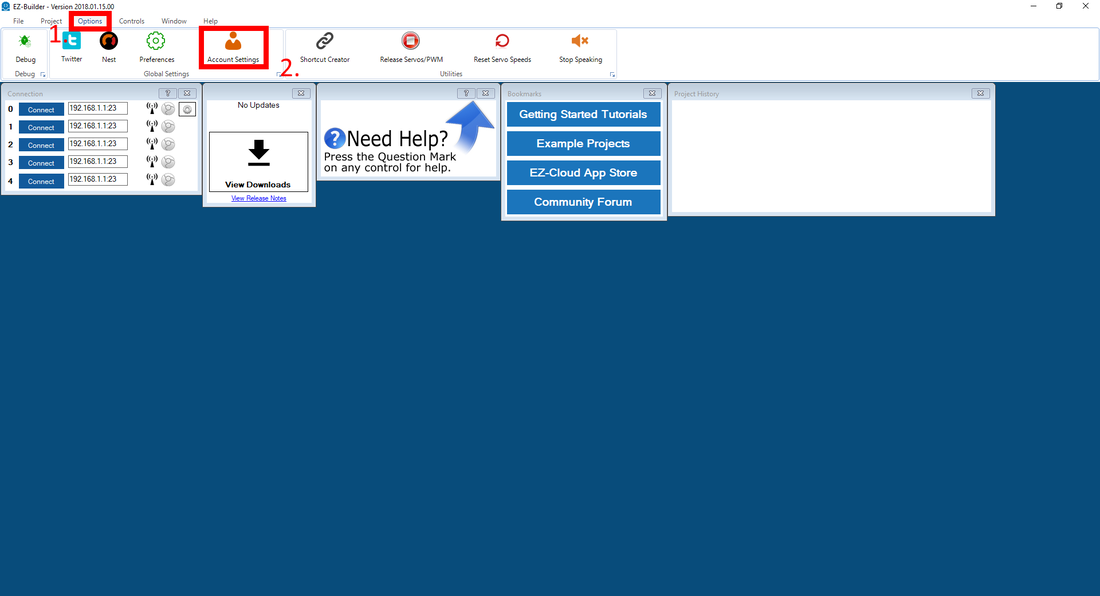
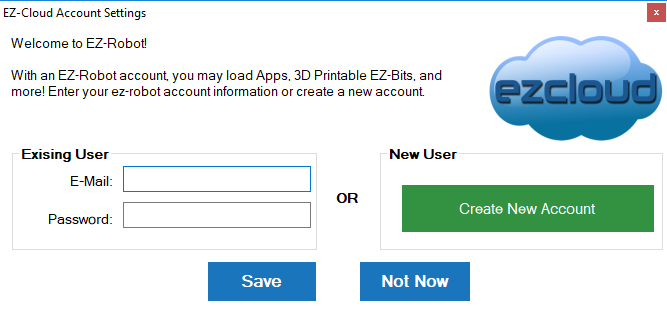
At this point, you can choose whether to make a general account, or to create individual ones.
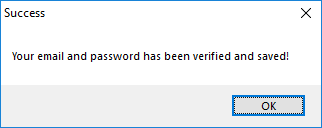
If you created an account and logged in correctly, it should give you this popup.
Above is the EZ-Builder home page that you should see.
You may get a pop-up that looks like the one above. Clicking on one of the images takes you to the EZ-Robot website tutorial section. In there you can find a multitude of tutorials for everything the robot can do. This is useful later if you have problems, but for now, you can click “Skip”.
Now that we have logged in, we need to sync the bit library. At the top left, click on the “Project” tab, then the button that is labelled “Library”.
In the new window that pops up, click “Sync Now”. Allow it to sync.
Wait for the process to complete, then click “Close” at the bottom left.
Setting Example Projects to Read-Only
As sometimes projects can become corrupted or lost, it is important to set the example project files to ‘read-only’. This means that they cannot be overwritten, and you will always have a project that can operate the robot ready to go. You will need to do this if you ever update EZ-Builder as well. If you installed the EZ-Builder in the default place, follow the instructions below.
Open the Start Menu, type in “Run”, and hit Enter.
Copy and paste in this line: C:\Users\Public\Documents\EZ-Builder\Examples
Click “OK”.
Then highlight all of the projects as shown above by clicking and dragging. Right click on one of the projects and select “Properties”.
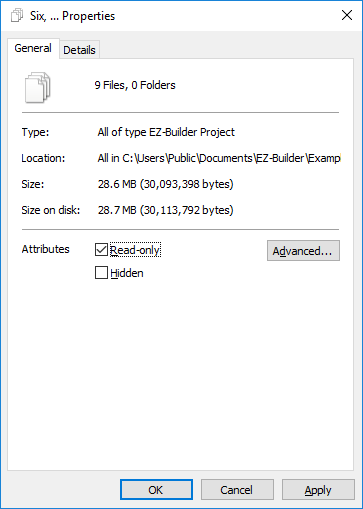
In the Attributes section, check off the box labelled “Read-Only” and click “Apply”.
Now the example project files cannot be overwritten.
Mobile Version (Android/iPhone/iPad)
First, go to either the App Store for Apple devices, or the Google Play store for Android devices. Search for EZ-Builder; download and install it.
Once the download is complete, open the app. You will get a screen of terms and conditions. Scroll down and agree to them.
First, make sure you are connected to a local WiFI network.
Go into Preferences and log in to your EZ-Robot account. If you do not have an account, you will need to create one to continue.
Once you have entered your email and password, tap on Save. You should get a popup with Success if you have done this correctly.
Now, you need to download and install the project for your robot. Go to Public EZ-Cloud Apps. Wait until the menu settings load, then tap Search.
Find your robot, and tap on Details beside it.
At the top right, tap on Download and Install. You are now ready to use the Mobile Version.
EZ-Robot Best Practices
Changing the Robot's SSID This is useful as it allows you to name your robot whatever you want, and distinguish it from other robots in the WiFi list. To do this, follow the instructions below.
Turn on the robot and open EZ-Builder on your computer. It is not possible to do this on mobile.
Connect to the robot through the computer WiFi.
On the EZ-Builder, find the Connections Window.
There will be a small Chrome symbol beside an antenna. Click on this symbol.
This will take you to the EZB settings in your browser. Look on the left side and click on Client Mode.
From here, you can change the SSID to be whatever you want. you can optionally also add a password to the robot, using WPA2 protocol.
Click on save, and it will reboot your robot. You will now need to connect via WiFi to your robot's new SSID.
Take a piece of masking tape, and write down what you named your robot on it. Then put that masking tape on the EZB, so you can tell which robot is which.
If you don't feel like changing you robot's WiFi SSID, then we recommend taking the last 4 digits of the robot's number code, writing them down on a piece of masking tape, and taping it to the robot.
Pairing and Numbering Equipment One way to easily be able to troubleshoot robots is to always pair a robot with the same laptop,charger, etc. By doing this, you make figuring out what is going wrong with the robots much easier. As an example, if Robot #1 is unable to connect to Laptop #1, change out Laptop #1 with Laptop #2. If the robot is able to connect, then the problem may lie with Laptop #1. If the robot is still unable to connect, it may be due to Robot #1 having a problem. This same procedure should be repeated for every Robot, Charger, Laptop, Tablet, etc.
This procedure can be very important for finding problems that may be caused my multiple different pieces of hardware, software, or users.
A small piece of masking tape with the robot's number or name written on it, along with similar pieces of tape on all paired equipment, should suffice.
Same Students, Same Robot Having the same students work on the same robot every day helps keep the class orderly, and ensures that the students are handling the robots respectfully. If necessary, you could even tell the students that they are only going to get one robot, and if it breaks, they may not be able to use it until it is repaired. This makes sure that the students take adequate care of the robot and treat it with the proper respect. This also helps deal with the "It wasn't me" issue. As an example, if a second period class begins, and a student group comes up to let you know that their robot won't turn on or is broken, you know who might be responsible.
Troubleshooting and Assistance
If you have any problems with setting up EZ-Builder, or if there are any issues with this guide, please contact [email protected] for more assistance.